
The 3 day OS X Support Essentials 10.11 course
Day 1 Agenda
Installation and Configuration
- Install OS X El Capitan
- Setup and Configure OS X
- Use OS X Recovery
User Accounts
- Manage User Accounts
- Manage User Home Folders
- Manage System Security
- Manage Keychains
File Systems and Storage
- Manage File Systems and Storage
Notes from Day 1
Enabling Administrator Accounts
A System Administrator is known as the Root user. The Root user account has unlimited access to everything on a Mac – it is not enabled by default. To enable a Root user follow the instructions on the Apple support page here (it doesn’t appear in User & Accounts): https://support.apple.com/en-gb/HT204012 Any Admin account can setup a Root account therefore to safeguard the Root account an Admin account may need to be limited.
An Admin user can make additional Admin accounts with equal rights.
Admin users can’t see each others Home folders- a System Administrator (Root) can.
Enabling the Guest Account
Guest accounts (everyone access, no password required) – not enabled by default. To enable follow the instructions here:
- Choose Apple menu > System Preferences, Users and Groups
- Click the lock to unlock, enter an admin name and password
- Select Guest User from the list
- Select “Allow guests to log in to this computer“
Can be useful to enable Guest user account so that if the Mac is stolen it allows anyone access to enable Internet connection and therefore enable tracking via Find My Mac.
Note also that the Home folder within the Guest account is deleted when logged out – in other words any documents created in the Guest account will be lost/deleted.
System Passwords
Master Password
A Master password is not created by default, this has to be setup in Apple > System PreferencesUsers > & Groups (unlock with admin password) > click the Action button (gear icon), select “Change Master Password” – it can be useful to setup a Master password as it enables local account passwords to be reset. Note it does not reset any keychain passwords.
To reset a user’s password (after a Master password has been enabled):


[This was so easy to reset!]
A User account password can also be reset via the login window drop down menu that appears when you enter a wrong password. Local accounts can also reset using the Apple ID https://appleid.apple.com.
Firmware password
A firmware password is a more secure option for your Mac and enables you to set a password at hardware level. A password at this level will stop anyone from resetting your password, wiping your Mac and reinstalling the OS. For the ultimate security of your Mac, lock your Mac with a firmware password and switch on FileVault, Apple’s encryption scheme. Here is how to do it:
To enable the Firmware password:
- Shut down the Mac
- Start up the Mac, when you hear the chime sound hold down Command-R (You can let go when you see the progress bar)
- Click on Utilities which is on the menu bar above the Recovery Window, click Firmware Password Utility, as shown here:
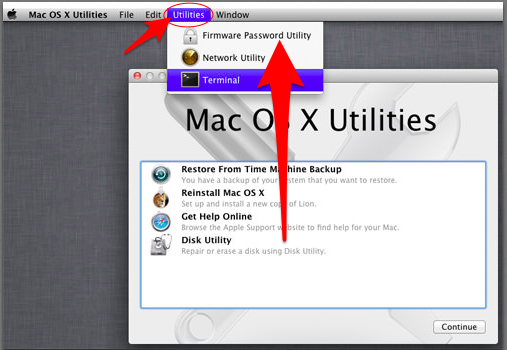
- In the window that appears, click Turn on Firmware Password
- Enter the password
- Click Set Password
- Click the Apple menu and select Restart
- The firmware password will be active the next time the Mac starts up.
Apple support page for setting the firmware password https://support.apple.com/en-gb/HT204455
Day 2 Agenda
File System and Storage (Continued)
- Manage FileVault
Data Management
- Manage Permissions and Sharing
- Use Hidden Items, Shortcuts, and File Archives
- Manage System Resources
- Use Metadata and Spotlight
Applications and Processes
- Install Applications
- Manage Documents
- Manage and Troubleshoot Applications
Notes from Day 2
Fast User Switching
Fast User Switching allows different users to have their own account/login area on the same computer. Users can switch between accounts without having to logout. For teaching you could create a separate login for presentations or creating screen casts.
To switch Fast User Switching on:
- Go to Apple > System Preferences > Users & Groups
- Click the lock and unlock with Admin password
- Click in the tick box for “Show fast user switching as“
- Click on the drop down box and select one of three options: Full Name, Account Name or Icon

5. The Account login name appears in the top right hand corner of the screen. Click on a name from the drop down menu to switch accounts.
. 
Note: when you shut down you will also need to logout of each account.
How To Switch On FileVault
FileVault encrypts the data on your disk to prevent any unauthorised access. It’s easy to switch it on, here is how:
- Click on the Apple menu, select System Preferences
- Select Security & Privacy
- Click the lock, and unlock with your admin password
- Click Turn on FileVault
- Restart is required for older Macs to begin encryption.
Apple support page for using FileVault https://support.apple.com/en-gb/HT204837
Manage Permissions and Sharing
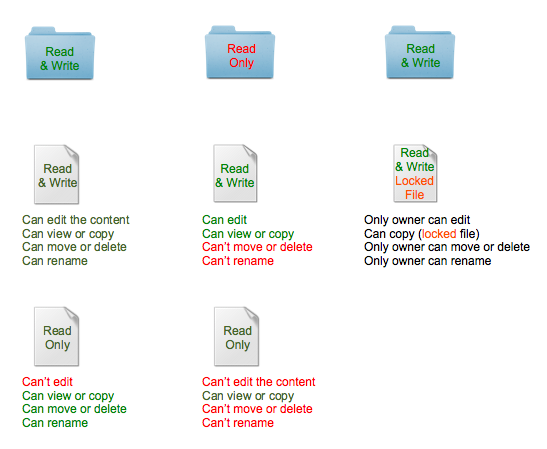
Within Finder, select the file or folder, press Command-I (this brings up the Get Info pane which you can also access by clicking on File > Get Info)
The following image shows the different permissions settings available for files and folders:
The Public folder enables sharing with other users on the network – every user can have access to each user’s Public folder . Inside the Public folder is a Drop Box folder with write only access. The Drop Box folder can be used to share secure documents. Documents are only able to be dropped into the folder (hence the name Drop Box), the folder contents are only accessible/viewable by the owner. If you try to open the folder, a popup message appears as shown below:

Explore further permission settings here https://support.apple.com/kb/PH21997?locale=en_US&viewlocale=en_US
Password Protect Folders
- Use Spotlight (press Cmd + spacebar) and type Disk Utility into the Spotlight search bar
- Click on File/New/Image From Folder, select Image
- Select image format as “Read/Write“
- Select 128-bit encryption and Save

This creates an encrypted disk image (.dmg file extention). To open the image, double click and enter the password when prompted – make sure you uncheck the option to “Remember password in keychain”.

The image will open in Finder and you can treat it the same as any other folder by dragging files and folders into it. To close and protect the folder again, click the eject button.
Using Quick Look
Quick Look is a way of quickly previewing your documents. The feature is available for use in:
- Finder
- Spotlight
- Time Machine
- Open and Save dialog boxes
- Print dialog boxes and print queues
To use Quick Look, press the spacebar (or Command-Y) and a preview window opens showing the document. This can be a quick way to view a file without having to open it.
Try this now:
- Open Finder and browse to a one of your documents
- Click to select the file, press the spacebar – a preview of the document appears in a window.
Monitoring Processes via Activity Monitor
The Activity Monitor can help identify any apps or background processes that are slowing down your computer or that have crashed (not responding). There are different tabs within the Activity Monitor window to check: CPU, Memory, Energy, Disk and Network. In the View menu you can filter the processes displayed to make it easier to find currently active processes or window processes (open apps). It can be useful to understand what Activity Monitor is telling you about your Mac. To learn more go to https://support.apple.com/en-gb/HT201464.
Force Quit an Application that is Not Responding
If an application is not responding you can Force Quit the application by holding down Command-Option-Escape, in the dialog box that appears, click on the application that you want to quit and select Force Quit. See image below.

You can also use Force Quit by using:
- Control-Option + click (using the touch pad on your MacBook) or Option + Right Click if using a mouse
- With the application open, click on the Apple menu and hold down the Shift key – the Force Quit option appears.
Day 3 Agenda
Network Configuration
- Manage Basic Network Settings
- Manage Advanced Network Settings
- Troubleshoot Network Issues
Network Services
- Manage Network Services
- Manage Host-Sharing and Personal Firewall
- Troubleshoot Peripherals
System Management
- Manage Print and Scan
- Troubleshoot Startup and System Issues
Notes from Day 3
What is WebDav?
WebDav – Web-based Distributed Authoring and Versioning
WebDav uses the HTTP protocol and enables files to be shared from one device to another. It can be setup using a web server for remote access to files, or on your local home network. I use WebDav to share large files between my Mac and my iPad on my home network. It works with most operating systems such as Mac OS X, Windows and Linux which is great for sharing files between these different operating systems. I need to learn more about this feature but I will show you how I set it up on my Mac and iPad using apps (NB: the WebDav app instructions below are not related to the 3 days Apple training I received but something I setup previously, included here as it might be useful).
How to setup WebDav on your Mac and iPad
This is how I have set it up on my Mac using the WebDav Navigator app:
- I created a folder in Finder for dropping files I want to transfer (for example iPad_Files) or you can share an existing folder.
- Download the WebDav Navigator app from the Mac App Store.

3. The WebDav icon appears on the top toolbar.
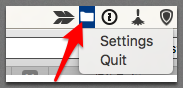
4. Click on Settings and click on “Select folder to share” and browse to your folder
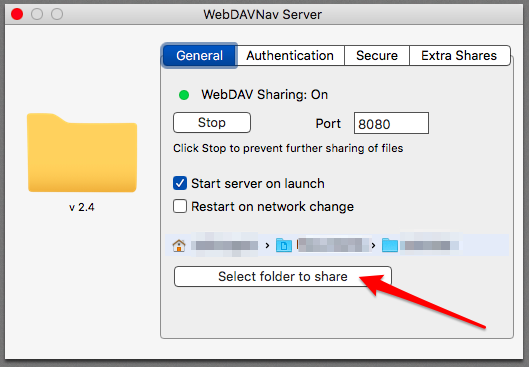
Click on the Authentication tab and enter your iCloud Apple ID username and password (the one used on your iPad).

Setup the iPad with the WebDav Nav app
- Download the WebDav Navigator app from the App Store on your iPad or iP

2. Open the app and tap on the + to add a New Server.
Fill in the boxes:

3. Name = Enter a name for the folder
4. Server URL = You will need to know the name of your computer on the local network. To find your computer’s name, go to:
5. Apple > System Preferences > Sharing

6. Enter the Server URL, replace the computername with the name of your computer and enter it in this format: http://computername.local:8080 7. 7. Username = Enter your iCloud Apple ID username
8. Password = Use the iCloud Apple ID password
9. Save
Start Using WebDav
To transfer a file, just add it to the folder you created for WebDav sharing.
Open the WebDav Nav app on your iPhone or iPad and tap your server connection.

You then see the contents of your shared folder. Press and hold a file in the list and a menu appears with a list of options.
Tap Open with… and browse through to choose an app you would like open the file. The file will then live in the app, where as, if you close the WebDav connection (by closing WebDav Nav on your computer) you won’t be able to access the file.

There is a lot more you can do with WebDav, for example having it connect to a server address and being able to access your files remotely. If you have a server address you can go to Finder > Go > Connect to Server (shortcut: Command + K) and set this up.
For further information on WebDav go to http://webdav.org/
Troubleshooting WebDav
If you receive a message to say “could not connect to server” check that you have the WebDav app open on your computer (you should see the WebDav icon on the top toolbar when open).

Screen Sharing using the Message App
The Messages app supports screen sharing which can be a useful feature if you are trying to help someone troubleshoot an issue with their computer. To access screen sharing in Messages:
- Open the Messages app (must be signed in to iCloud)
- Click on Details
- Click on the screen share button
- There are two options: Invite to Share My Screen or Ask to Share Screen

To find out more about this feature go to http://www.idownloadblog.com/2016/02/11/how-to-screen-share-mac-messages-app/
AirDrop
AirDrop enables you to send photos, webpages, notes etc wirelessley to another Apple device. This feature works on Macs from 2012 onwards using OS X Yosemite or later and needs iOS 7 or later on the iPad or iPhone. Devices need to be within 30 feet of each other, as it uses both Wi-Fi and Bluetooth.
To Turn on AirDrop:
Go to Finder > Go > AirDrop

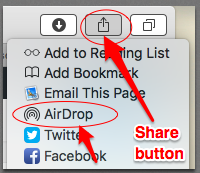
To send something via your Mac AirDrop you can:
- Drag a file from Finder into the AirDrop window (shown above)
- Go to the Share button (if available) from within an app and click AirDrop.
- Control Click on a file in Finder and select the Share option from the menu.
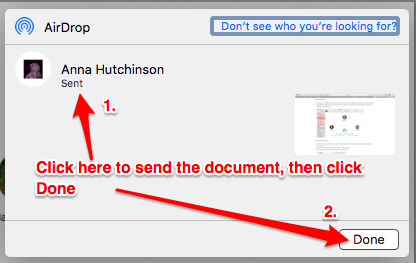
Note: Documents are automatically received if sent to devices with the same iCloud account. Sending to anything else requires the recipient to “allow” before it is saved.
Further information can be found here: https://support.apple.com/en-us/HT203106
Screen Sharing
The Mac has build in software that makes it possible to share computer screens via one of three methods: Screen Sharing, Messages and Apple Remote Desktop (ARD). ARD isn’t included with the standard system software and is available for purchase through the Mac App Store for £59.99 (as of 09/16).
To use screen-sharing it first has to be enabled:
Go to Apple > System Preferences > Sharing > tick the Screen Sharing option

To connect to the other computer screen:
- Go to Finder
- Scroll down until you find the name of the computer you want to view in the sidebar, select it
- Click the Share Screen button

The shared screen appears on your computer.
For more information on screen sharing visit
https://support.apple.com/kb/PH21798?locale=en_US&viewlocale=en_US
